HTML Tutorial For Beginners In Hindi (With Notes) Chapter – 0 (Introduction) HTML – Hyper Text Markup Language Html is the language of the web. It is used to create websites. We use HTML tags to define the look and feel of a website. With an understanding of these tags and How to put them together, we can create beautiful websites easily! Then why CSS and JavaScript HTML is used for defining the layout of a page – A barebone page structure. CSS is used to add styling to that barebone page created using HTML. JavaScript (JS) is used to program logic for the page layout. E.g. what happens when a user hovers on a text when to hide or show elements etc? A Beautiful analogy HTML = Card body (only metal) CSS = Car paint, design, etc. JavaScript = Car engine + Interior logic We will start learning how to build beautiful layouts in this course. Installing VS Code We can use...

1.- What is WS-Word?
- The WS-Word is application software. It's used to do office work easily.
It's used to change letter formatting, editing text, editing text style & It had many options for doing office work easily.
there are two ways to open the WS-Word on the computer.
these are here below.
This is the first way to open WS-Word.
1. go to the "Start Menu " on the computer.
2. Now go to the " All Program " on the computer.
3. Now go to the "MS-Office " option.
4. And Now Click the "MS-Word " option.
And finally, MS-Word is opening ...
This is the second way to open MS-Word.
1. Press the "Windows Button + R "
2. And now write the dialog box "Winword".
3. Now click "Ok ".
And Finally, MS-Word is opening... And you guys see this type of layout when the MS-word.

Now we are going to see some options and the menu of MS-Word.
The first menu is here below.
File Menu

1. New:- After opening the MS-Word window we click the Blank option and Then the blank page is opening. And now the new page is on the user screen. And the new page Shortcut key is here " Ctrl + N". When we press this shortcut key the new page is opening this time.

2. Open:- This is the best option for opening the old files. It's only used for opening old files
Its shortcut key is " Ctrl + O".
3. Save:- This option is used for saving any file on the computer only in MS-word. Its shortcut key is "Ctrl + S". Press the shortcut key and give them any name of file click "ok" or press "Enter Button".And the file is saved.
4. Close:- In this chapter, we will understand how to close a document in Word 2010. When you finish working with a document, you will proceed to close the document. Closing a document removes it from your computer screen and if you had other documents open, Word displays the last document you used otherwise, you see a blank Word window. Here are simple steps to close an opened document −
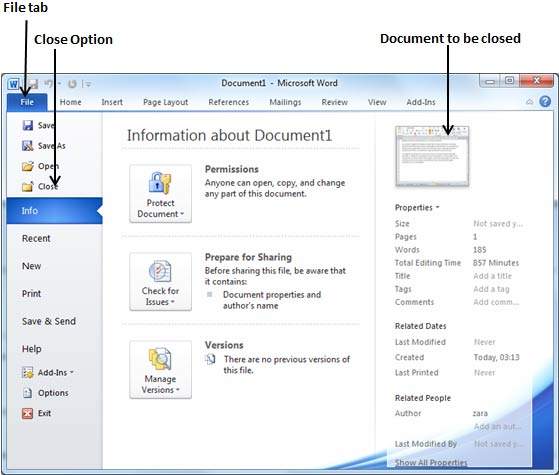

Step 1 − Click the File tab and select the Close option.
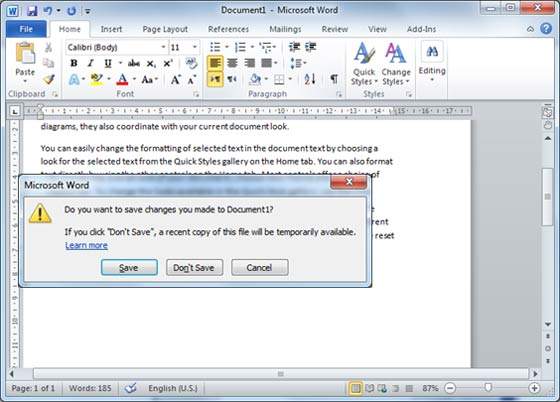
Step 2 − When you select the Close option and if the document is not saved before closing, it will display the following warning box asking whether the document should be saved or not.
Step 3 − To save the changes, click Save, otherwise click Don't Save. To go back to the document, click Cancel. This will close the document and if you have other documents open, Word displays the last document you used, otherwise, you see a blank Word window as shown below −
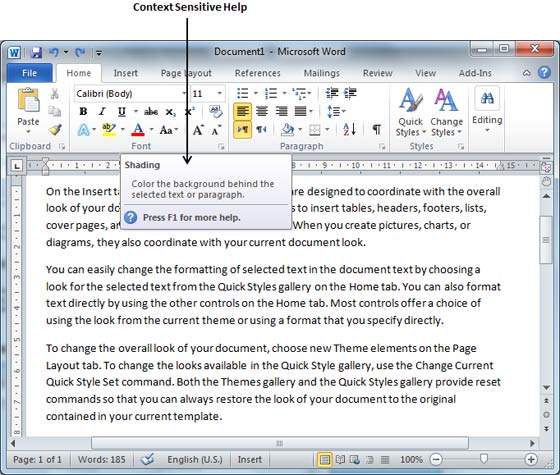
In this chapter, we will discuss the Context Help in Word 2010. Microsoft Office provides more than one method for calling up Help when you need it. We will discuss a few important methods in this chapter −
Context-Sensitive Help
This is the easiest way of getting help about any of the options available on the word screen. You just need to bring your mouse pointer over an option and wait for 2 seconds, MS Word will pop-up a small balloon to help to give you detail about the operation. If the word has additional help for that option, then it gives the option Press F1 for more help as shown below when you bring your mouse pointer over the color fill option. You can press the F1 key to get further help with this option.
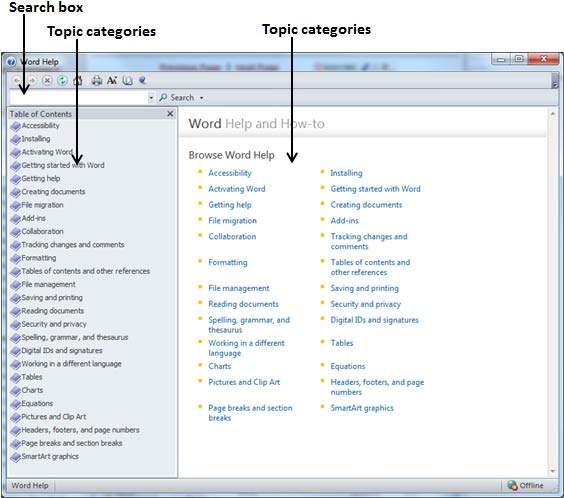
Using F1 Key
You can press the F1 key when you are in the middle of doing something and Office will display the various categories of help as shown below. You can either search a keyword using the Search option or you can browse the listed categories to go through a topic in detail −
Using Help Icon
You can also have a similar help window as shown above, by clicking the Help icon located just above the right edge of the ribbon as shown below −
Using the Help Option
You can communicate with Microsoft using the Help option available under the File tab.
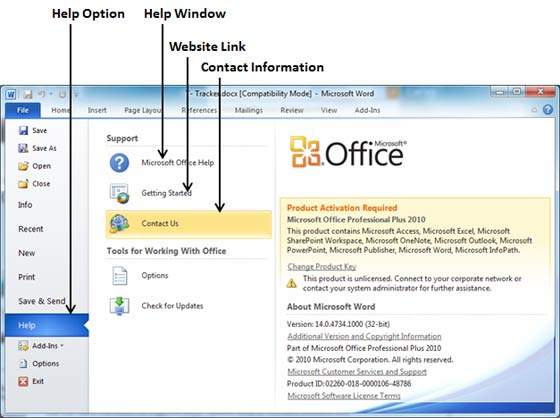
As shown above, you can use Microsoft Office Help to launch the Help window, or the Getting Started link to go to Microsoft’s official website, otherwise use the Contact us option to contact Microsoft via email or phone.
In this chapter, we will discuss how to insert text in Word 2010. Many times it is required to go back and insert additional text in an existing line. Microsoft Word provides two ways to insert text in existing text and we will show how to use both the methods of inserting text −
Insert and Add Text
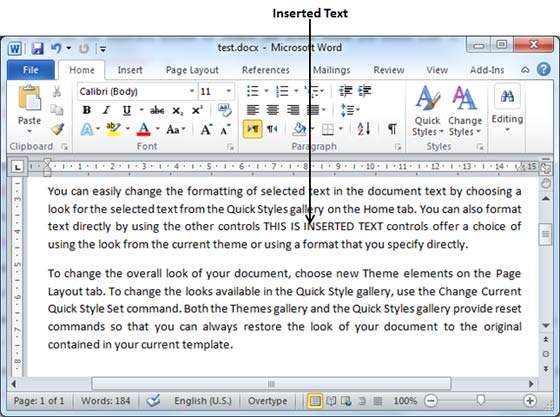
First, we will see how the inserted text will be added to the existing content without replacing any existing content.
Step 1 − Click the location where you wish to insert text; you can also use the keyboard arrows to locate the place where the text needs to be inserted.
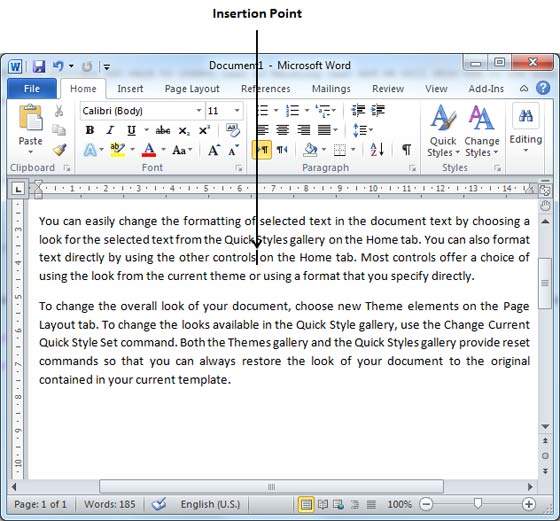
Step 2 − Start typing the text that needs to be inserted. Word inserts the text to the left of the insertion point, moving the existing text to the right
Insert and Replace Text
In the Insertion mode, the text will be added into the existing content but same time it will overwrite all the content which comes in its way.
Step 1 − Right-click the status bar and select the Overtype option from the displayed menu.
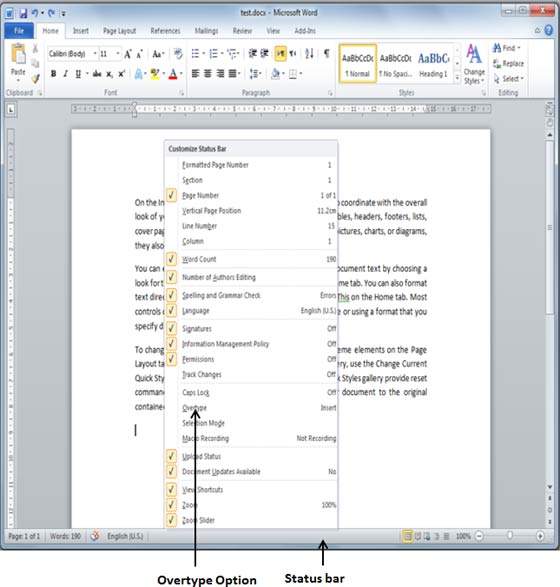
When you select the Overtype option, the status bar will show the insert mode as shown below −
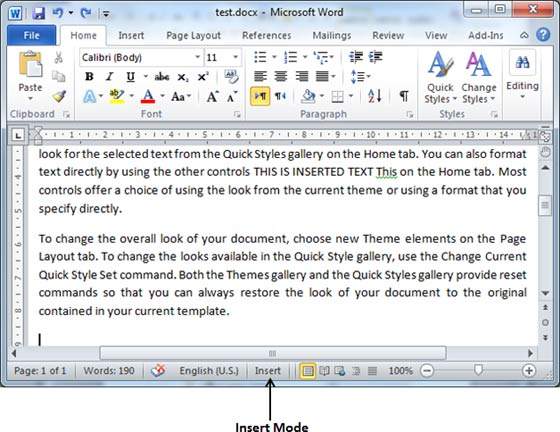
Step 2 − Click on the Insert text available at the status bar and it will switch to the Overtype mode as shown below −
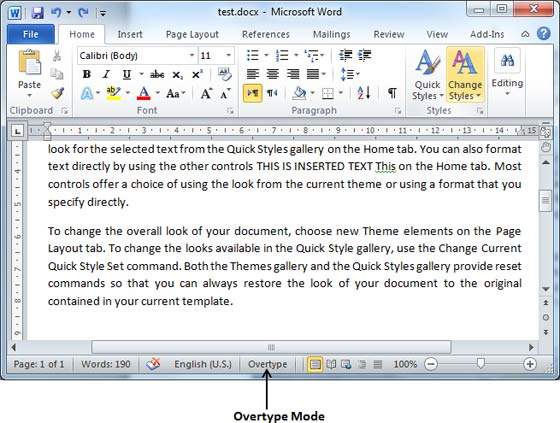
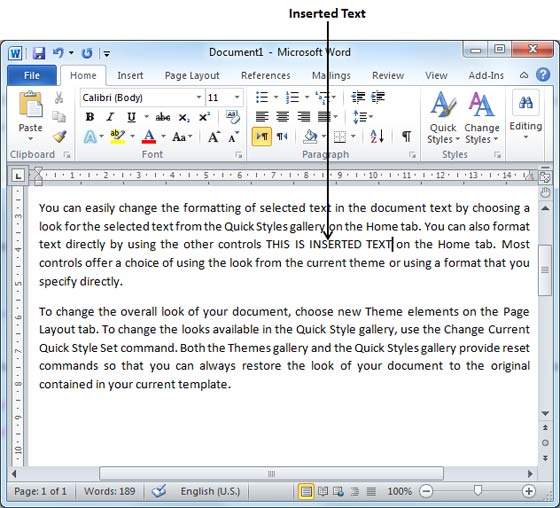
Step 3 − Now click the location where the text needs to be inserted or you can use the keyboard arrows to locate the place where the text needs to be inserted.
Step 4 − Start typing the text that needs to be inserted. Word will replace the existing text with the newly typed text without moving the position of the exiting test.
Note − Microsoft Word 2010 disabled the functionality of the Insert key and it does nothing, so you will have to follow-up with the above-mentioned procedure to turn-on or turn-off the Insert mode.
In this chapter, we will discuss how to select text in Word 2010. Selecting a text is one of the most important skills required while editing a word document. You can perform various operations on a selected text; you can delete the selected text, copy it, move it, apply formatting to it, change its capitalization, etc.
The most common method of selecting a text is to click and drag the mouse over the text you want to select. Following table lists down a few other simple methods that will help you in selecting text in different scenarios −
| S.No | Component & Selection Method |
|---|---|
| 1 | Selecting text between two points Click at the start of the block of text, hold down Shift, and click at the end of the block. |
| 2 | Selecting a single word Double-click anywhere on the word you want to select. |
| 3 | Selecting a paragraph Triple-click anywhere on the paragraph you want to select. |
| 4 | Selecting a sentence Hold down the Ctrl key and click anywhere in the sentence you want to select. |
| 5 | Selecting a column of text Hold down Alt, click and hold the mouse button, and drag over the column you want to select. |
Note that only one part of the document can be in the selected state. If you have one portion of the document in the selected state and as soon as you try to select any other part of the document, the previous part will automatically be de-selected.
Using the Selection Bar
The black shaded area in the following screenshot is called the selection bar. When you bring your cursor in this area, it turns into a rightward-pointing arrow.
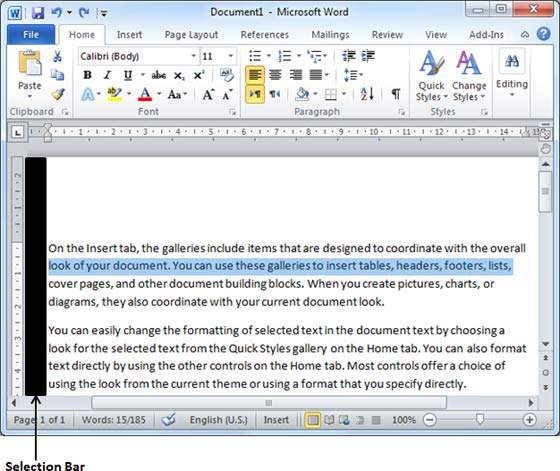
You can use the selection bar to select the various components of a document as described in the following table −
| S.No | Component & Selection Method |
|---|---|
| 1 | Selecting a line Bring your mouse into the selection bar area and click in front of the line you want to select. |
| 2 | Selecting a paragraph Bring your mouse to the selection bar area and double click in front of the paragraph you want to select. |
| 3 | Selecting the document Bring your mouse to the selection bar area and triple-click. |
Using the Keyboard
Keyboard provides very good support when you want to select various components of the document as described in the following table −
| S.No | Key & Selection Method Selecting Text |
|---|---|
| 1 | Ctrl + A Press Ctrl + A keys to select the entire document. |
| 2 | Shift Keep pressing the Shift key and use any of the arrow keys to select the portion of the text. |
| 3 | F8 Press F8 and then use any of the arrow keys to select the portion of the text. |
| 4 | Ctrl + Shift + F8 Press Ctrl + Shift + F8 and then use any of the arrow keys to select the column of the text. |

Comments
Post a Comment
If you have no doubt then comment here!